IBDesignable 和 IBInspectable 的可視化 View
在模組化的過程中,可能會遇到需要共用的 UI 元件,
一般的 CustomView: UIView 沒辦法顯示在 Storyboard 上,會呈現空空的 View,
如果想要在 Xcode 上直接顯示的話,就是需要使用 IBDesignable 和 IBInspectable。
功能說明
- IBDesignable:在客製化 View 前加上此關鍵字,Xcode 可直接顯示此 View 在 Storyboard。
- IBInspectable:在客製化屬性上加上此關鍵字來告訴,Xcode 可直接顯示屬性在右方的 Interface Builder。
[範例一]:可視的客製化View
- 步驟一:建立客製化 View,並標上 @IBDesignable,讓他變成可以在 Storyboard 被看到
- 步驟二:為了使我們的客製化類別能夠被即時的預覽,需要兩個initializers,
required init、override init - 步驟三:加入標上 @IBInspectable 的屬性,並且此屬性一定要定義類型(例如: UIColor、Int、CGFloat)
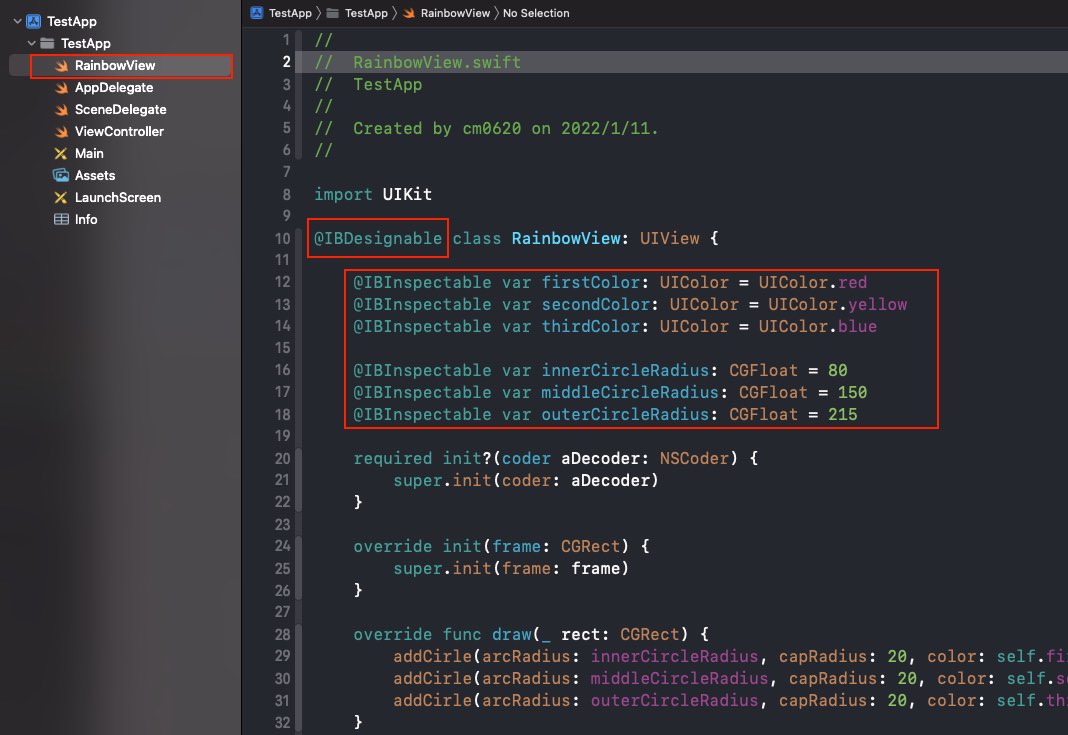
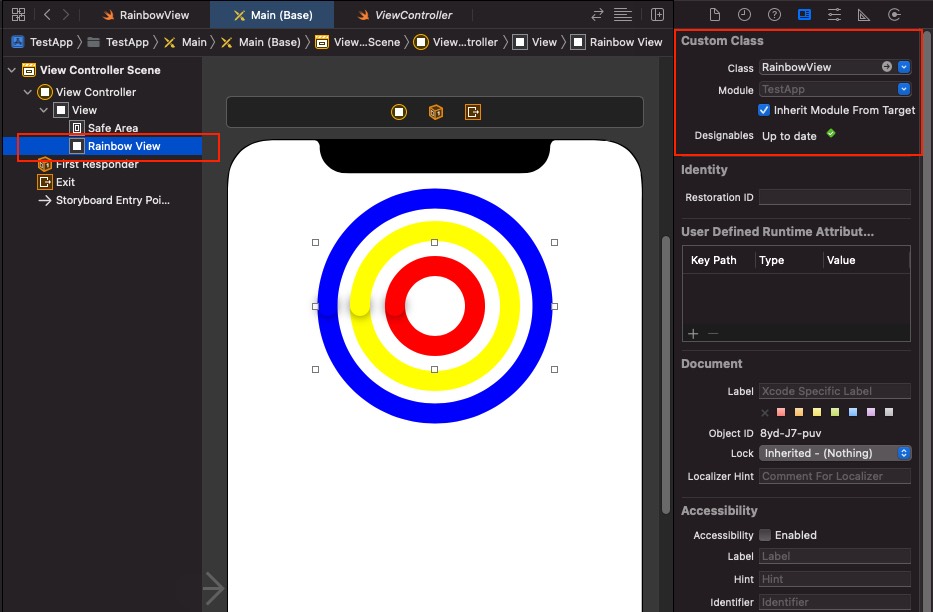
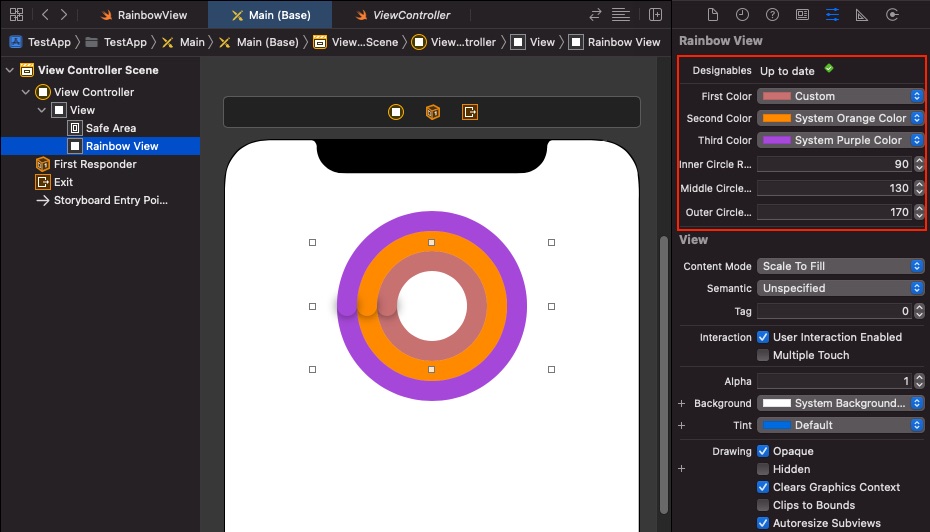
- 步驟四:在 Storyboard 上加上新 View,並將 CustomClass 設定為 RainbowView,此時會跑出 Designables 為 Up to date 就是正確。
有時會失敗看到 Designables 為 Build Fail,需要清 DerivedData 或重啟 Xcode 或是 Editor > Debug Selected Views / Refresh All Views
下面是範例程式碼
1
2
3
4
5
6
7
8
9
10
11
12
13
14
15
16
17
18
19
20
21
22
23
24
25
26
27
28
29
30
31
32
33
34
35
36
37
38
39
40
41
42
43
44
45
46
47
48
49
50
51
52
53
54
55
56
57
58
@IBDesignable class RainbowView: UIView {
@IBInspectable var firstColor: UIColor = UIColor.red
@IBInspectable var secondColor: UIColor = UIColor.yellow
@IBInspectable var thirdColor: UIColor = UIColor.blue
@IBInspectable var innerCircleRadius: CGFloat = 80
@IBInspectable var middleCircleRadius: CGFloat = 150
@IBInspectable var outerCircleRadius: CGFloat = 215
required init?(coder aDecoder: NSCoder) {
super.init(coder: aDecoder)
}
override init(frame: CGRect) {
super.init(frame: frame)
}
override func draw(_ rect: CGRect) {
addCirle(arcRadius: innerCircleRadius, capRadius: 20, color: self.firstColor)
addCirle(arcRadius: middleCircleRadius, capRadius: 20, color: self.secondColor)
addCirle(arcRadius: outerCircleRadius, capRadius: 20, color: self.thirdColor)
}
func addCirle(arcRadius: CGFloat, capRadius: CGFloat, color: UIColor) {
// 中心位置
let X = self.bounds.midX
let Y = self.bounds.midY
// 上半圓
let pathBottom = UIBezierPath(ovalIn: CGRect(x:(X - (arcRadius/2)), y:(Y - (arcRadius/2)), width:arcRadius, height:arcRadius)).cgPath
self.addOval(lineWidth: 20.0, path: pathBottom, strokeStart: 0, strokeEnd: 0.5, strokeColor: color, fillColor: UIColor.clear, shadowRadius: 0, shadowOpacity: 0, shadowOffsset: CGSize.zero)
// 左邊的小圓點
let pathMiddle = UIBezierPath(ovalIn: CGRect(x:(X - (capRadius/2)) - (arcRadius/2), y:(Y - (capRadius/2)), width:capRadius, height:capRadius)).cgPath
self.addOval(lineWidth: 0.0, path: pathMiddle, strokeStart: 0, strokeEnd: 1.0, strokeColor: color, fillColor: color, shadowRadius: 5.0, shadowOpacity: 0.5, shadowOffsset: CGSize.zero)
// 下半圓
let pathTop = UIBezierPath(ovalIn: CGRect(x:(X - (arcRadius/2)), y:(Y - (arcRadius/2)), width:arcRadius, height:arcRadius)).cgPath
self.addOval(lineWidth: 20.0, path: pathTop, strokeStart: 0.5, strokeEnd: 1.0, strokeColor: color, fillColor: UIColor.clear, shadowRadius: 0, shadowOpacity: 0, shadowOffsset: CGSize.zero)
}
///利用路徑畫圖
func addOval(lineWidth: CGFloat, path: CGPath, strokeStart: CGFloat, strokeEnd: CGFloat, strokeColor: UIColor, fillColor: UIColor, shadowRadius: CGFloat, shadowOpacity: Float, shadowOffsset: CGSize) {
let arc = CAShapeLayer()
arc.lineWidth = lineWidth
arc.path = path
arc.strokeStart = strokeStart
arc.strokeEnd = strokeEnd
arc.strokeColor = strokeColor.cgColor
arc.fillColor = fillColor.cgColor
arc.shadowColor = UIColor.black.cgColor
arc.shadowRadius = shadowRadius
arc.shadowOpacity = shadowOpacity
arc.shadowOffset = shadowOffsset
layer.addSublayer(arc)
}
}除此之外,在 Xcdoe 直接調整屬性可以讓他直接改變預覽呦,十分方便!
[範例二]:可視的客製化View並綁定使用Xib
步驟一:建立客製化View,並標上@IBDesignable,且加上一個contentView
步驟二:為了使我們的客製化類別能夠被即時的預覽,需要這兩個initializers,
required init、override init步驟三:加上利用Nib初始化View
步驟四:加入標上 @IBInspectable 的屬性,並且此屬性一定要定義類型(例如: UIColor、Int、CGFloat)
- 下面是範例程式碼
1
2
3
4
5
6
7
8
9
10
11
12
13
14
15
16
17
18
19
20
21
22
23
24
25
26
27
28
29
30
31
32
33
34
35
36
37
38
39
40
41
42
43
44
@IBDesignable class InputBarView: UIView {
///內容View
@IBOutlet weak var contentView: UIView!
///標題Label
@IBOutlet weak var titleLabel: UILabel!
///標題文字
@IBInspectable var titleText: String?{
get {
return titleLabel.text
}
set {
titleLabel.text = newValue
}
}
required init?(coder aDecoder: NSCoder) {
super.init(coder: aDecoder)
initViewFromNib()
}
override init(frame: CGRect) {
super.init(frame: frame)
initViewFromNib()
}
/// 利用Nib初始化View
private func initViewFromNib(){
let bundle = Bundle(for: type(of: self))
let nib = UINib(nibName:"\(type(of: self))", bundle: bundle)
if let view = nib.instantiate(withOwner: self, options: nil)[0] as? UIView {
self.contentView = view
self.contentView.frame = bounds
self.addSubview(contentView)
}
}
/// 完成設定Nib的事件
override public func awakeFromNib() {
super.awakeFromNib()
//可以在這做一些子代View設定....
}
}
- 下面是範例程式碼
步驟五:開啟 Xib 必做兩件事
- 第一件事:設定 File’s owner 的 CustomClass
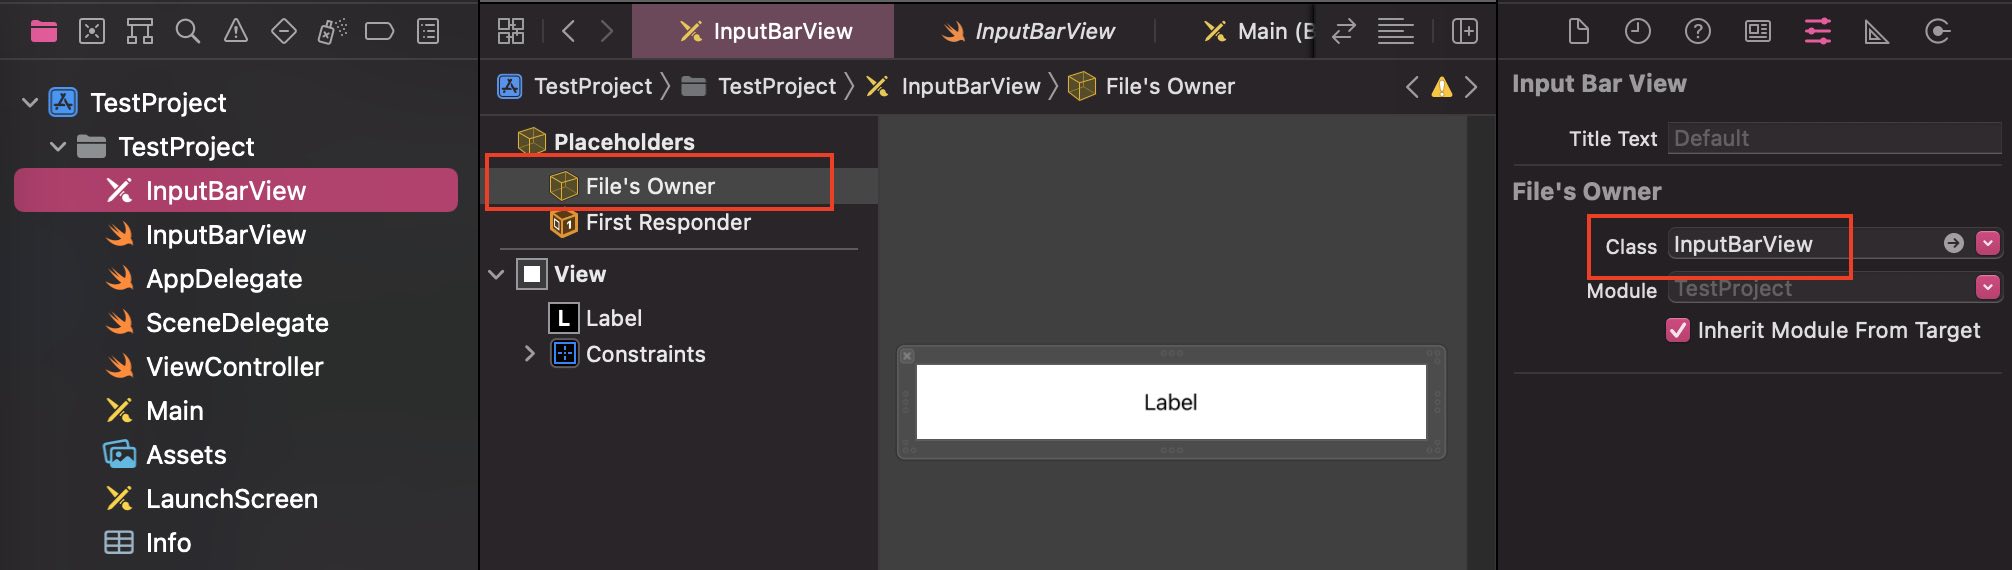
- 第二件事:連結 File’s owner 到 View
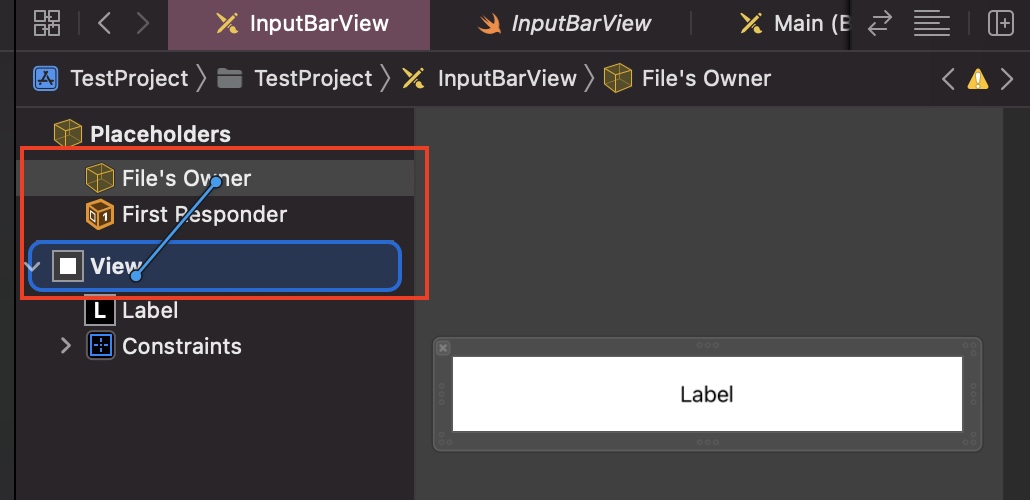
- 客製化內部View,此處新增一個 Label (依照狀況選用)
- 第一件事:設定 File’s owner 的 CustomClass
步驟六:在 Storyboard 上加上新 View,並將 CustomClass 設定為 InputBarView,並且去設定 Title text
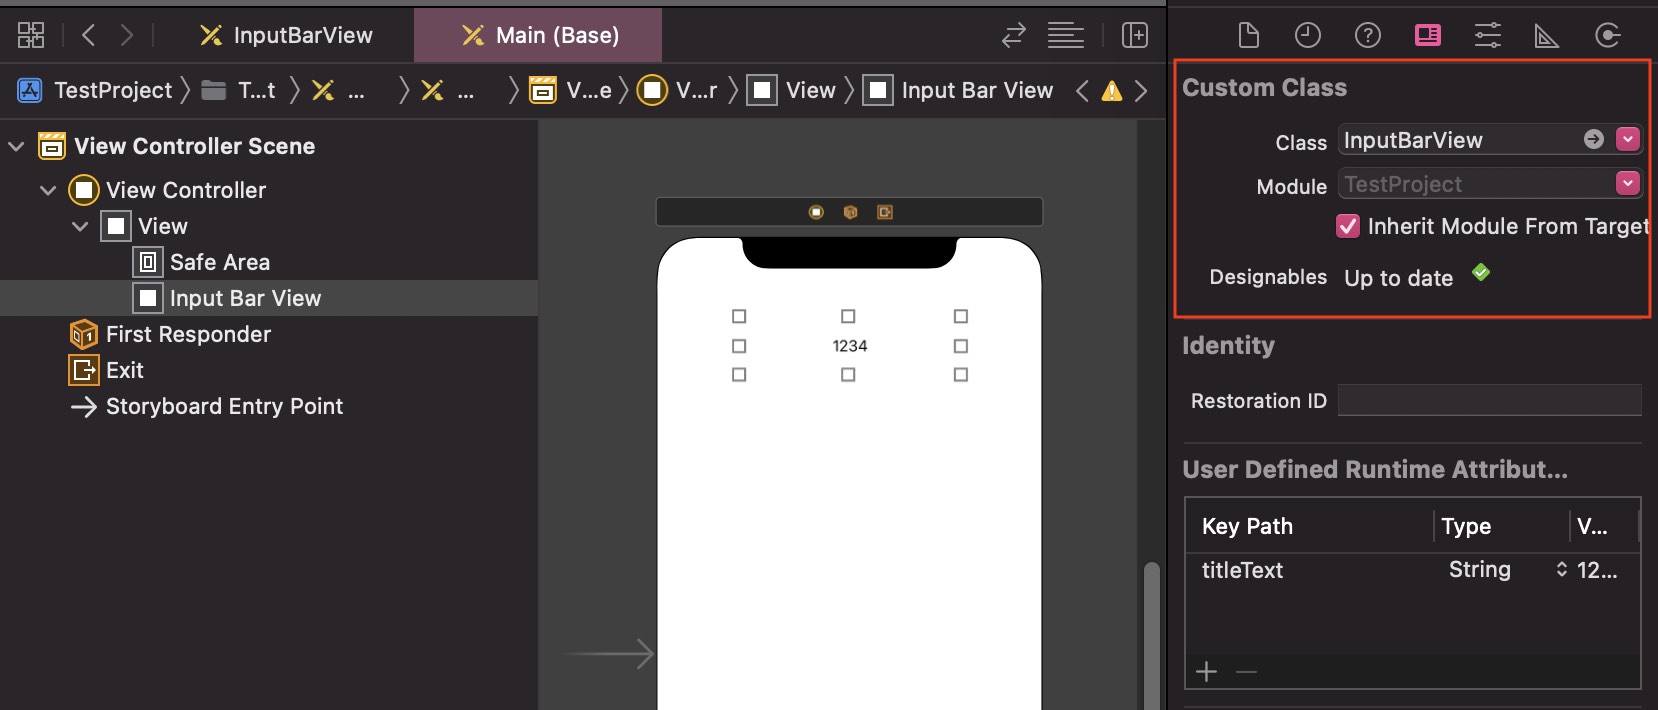
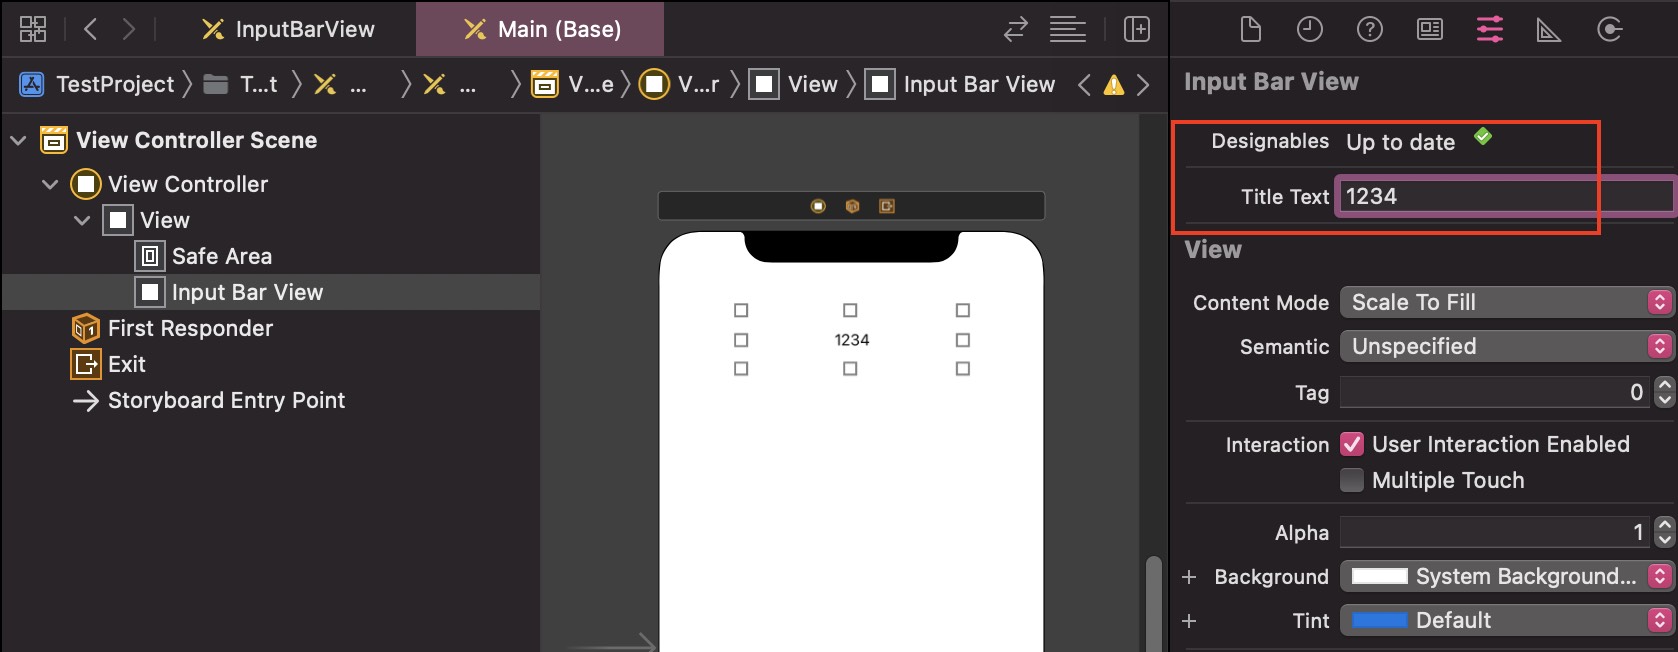
有時會失敗看到 Designables 為 Build Fail,需要清 DerivedData 或重啟 Xcode 或是 Editor > Debug Selected Views / Refresh All Views
其實用 Xib 在模組化的過程中,需要額外處理 import bundle 的問題,所以沒有很建議這樣做
所以漸漸地我也已改習慣用純程式碼,未來的天下 SwiftUI,也類似純程式碼的感覺,本身就自帶預覽功能,方便許多
Reference
希望這篇文章有幫助到您的開發之路!如果能給我一些按讚支持,我會非常感謝您的鼓勵!祝壞蟲遠離您!