iOS 模組化架構 (Modular Architecture in iOS) - 下
承接上一篇文章,為了解決”單一模組高度耦合多項功能”,因此我們想要對模組進行拆分,
可以自行建立模組清單來管理多個模組。
[第三期]:Podspec + CocoaPods Private Specs
建立 CocoaPods Private Specs 模組清單,由它來管理所有模組
CocoaPods Specs 就是用來集中管理多個 Podspec 版本控制的 Repository,簡單來說就是一份模組清單
最有名且公開的模組清單就是官方的 CocoaPodsSpecs 它包含全世界公開的三方套件
你當然可以建立自己的模組清單,例如 PinkPodsSpecs
只要有 Git 就可開發 CocoaPods Specs
- 如果使用公開 GitHub,就是公開的三方清單
- 如果使用私有 GitHub 或是公司內部 GitLab,就是私有內部的模組清單 ( 通常公司內部都需要這種的 )
建立清單方式
先決定好是否要公開清單,並決定好在哪裡建立 ( 這裡示範使用公開 GitHub )
先建立一個公開 Repo,叫做 PinkPodsSpecs (用來放清單)
同時也要建立一個公開 Repo 放 Framework,叫做 TestPodFramework (用來放一個模組)
- 這裡建議將 TestPodFramework 先新增一個 README.md,因為預設 Repo 是沒有分支的,容易造成後面步驟錯誤
將第二期的
TestPodFramework放進剛剛建立的 Repo,並且編輯TestPodFramework.podspec- s.homepage 改成 Framework 網址
- s.source 改成程式碼 Clone 網址
1
2
3
4
5
s.description = 'TestPodFramework'
s.homepage = 'https://github.com/pinkpika/TestPodFramework'
s.license = { :type => 'MIT', :file => 'LICENSE' }
s.author = { 'PinkPika' => 'ooxx@gmail.com' }
s.source = { :git => 'git@github.com:pinkpika/TestPodFramework.git', :tag => s.version.to_s }
將
TestPodFramework上傳 push 程式碼到 GitHub,並且打上 tag 為目前的版號,例如’0.1.0’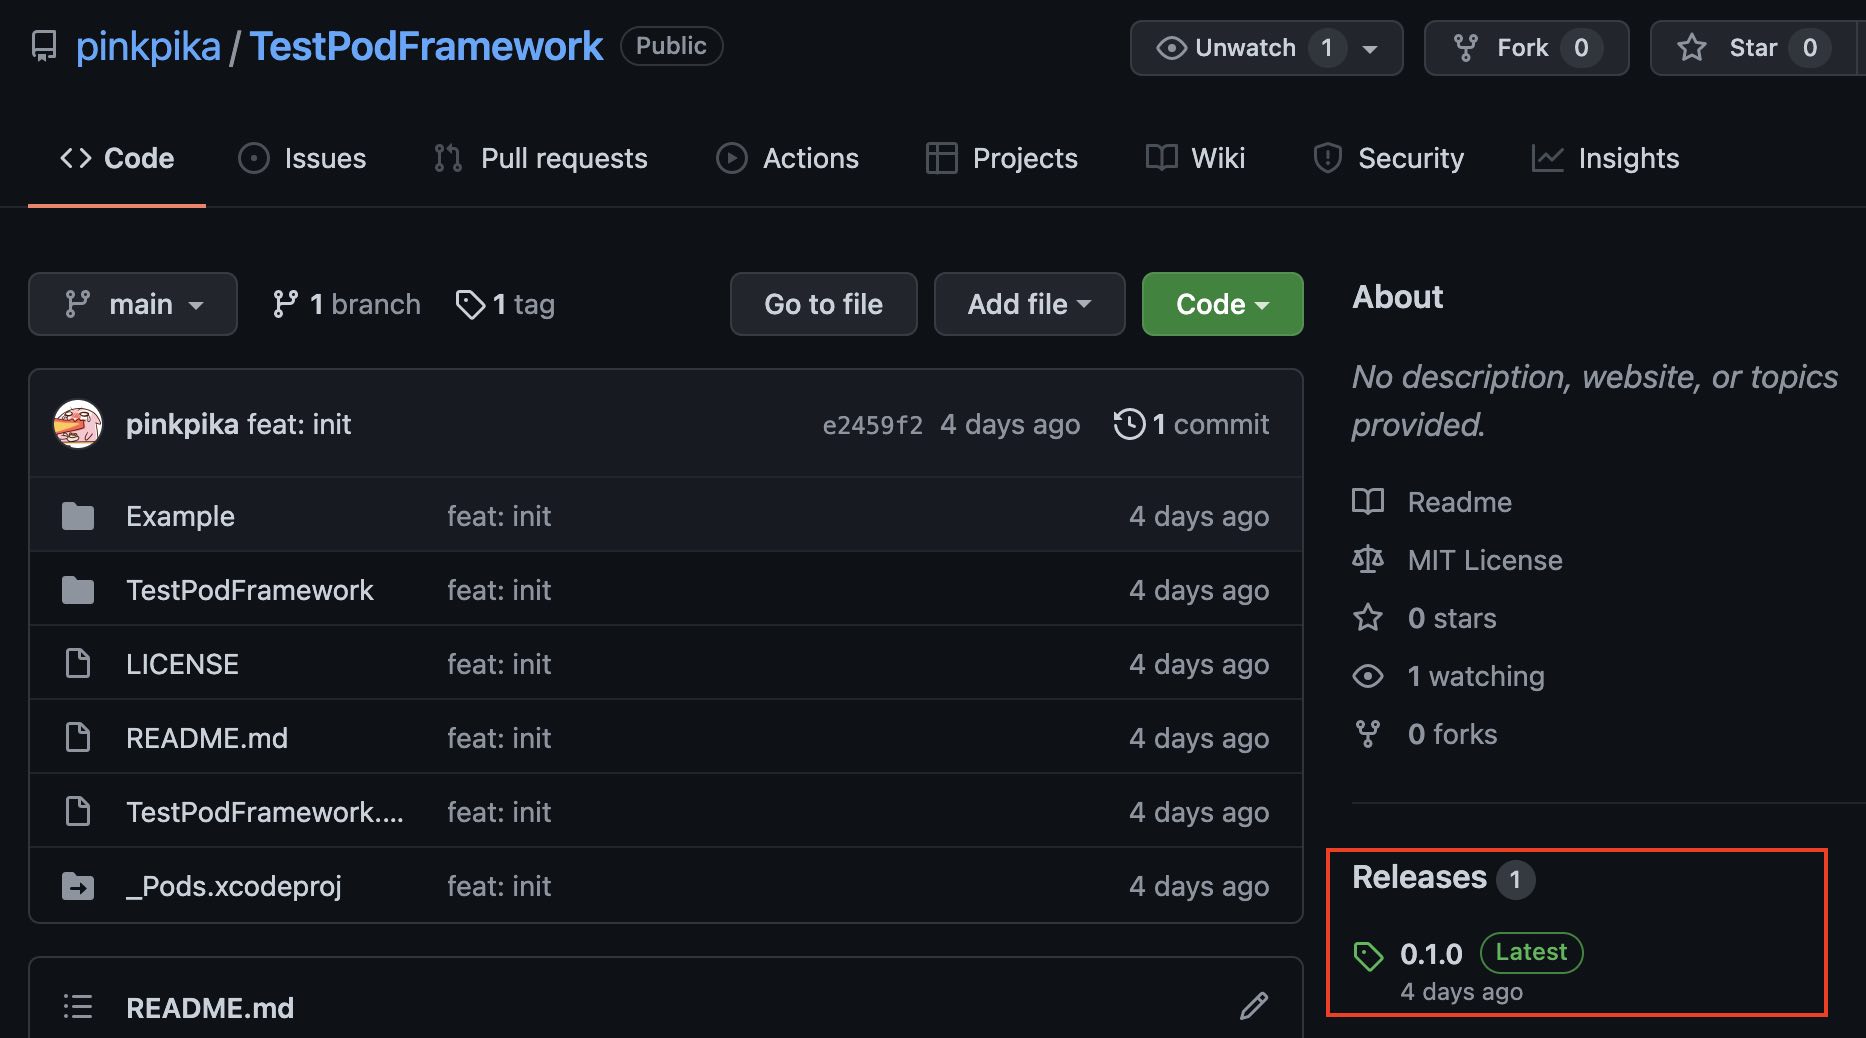
在終端機執行下面指令,下載三方清單
1
pod repo add PinkPodsSpecs git@github.com:pinkpika/PinkPodsSpecs.git
在
TestPodFramework資料夾目錄執行下面指令,可以驗證程式碼,並且發版加入三方清單1
pod repo push PinkPodsSpecs TestPodFramework.podspec --allow-warnings --verbose
如果看到 PinkPodsSpecs 內有
TestPodFramework就算成功!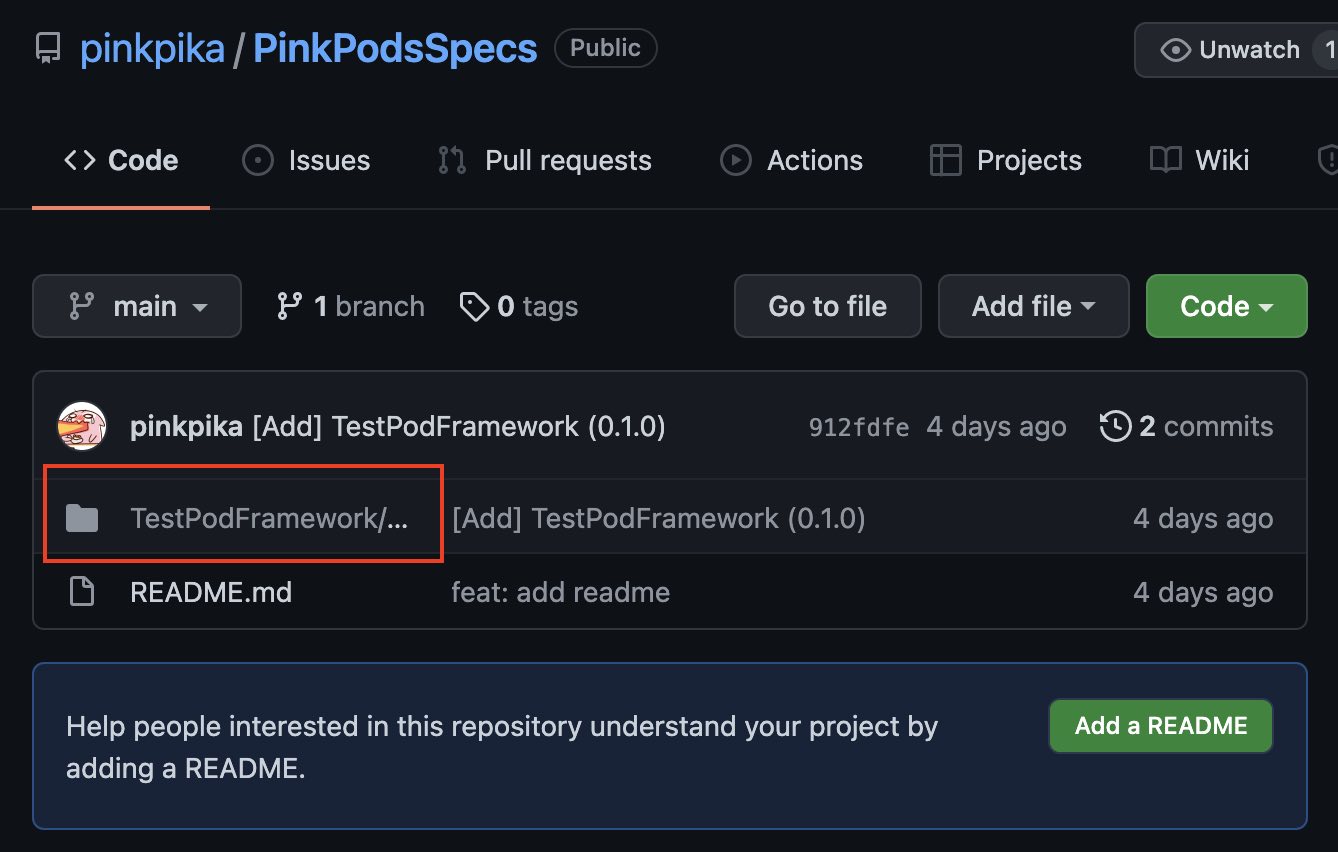
使用模組方式
只要依照下面方式編輯 PodFile,最後重新 pod install 即可 !
[編輯前] PodFile:
1
2
pod 'TestPodFramework', :path => '../TestPodFramework' #(第一種-讀本地模組)
pod 'Charts', :git => 'git@github.com:danielgindi/Charts.git' #(第二種-讀遠端Repo)[編輯後] PodFile:
1
2
3
source 'git@github.com:pinkpika/PinkPodsSpecs.git' #(載入私有清單)
source 'https://github.com/CocoaPods/Specs.git' #(載入公開清單)
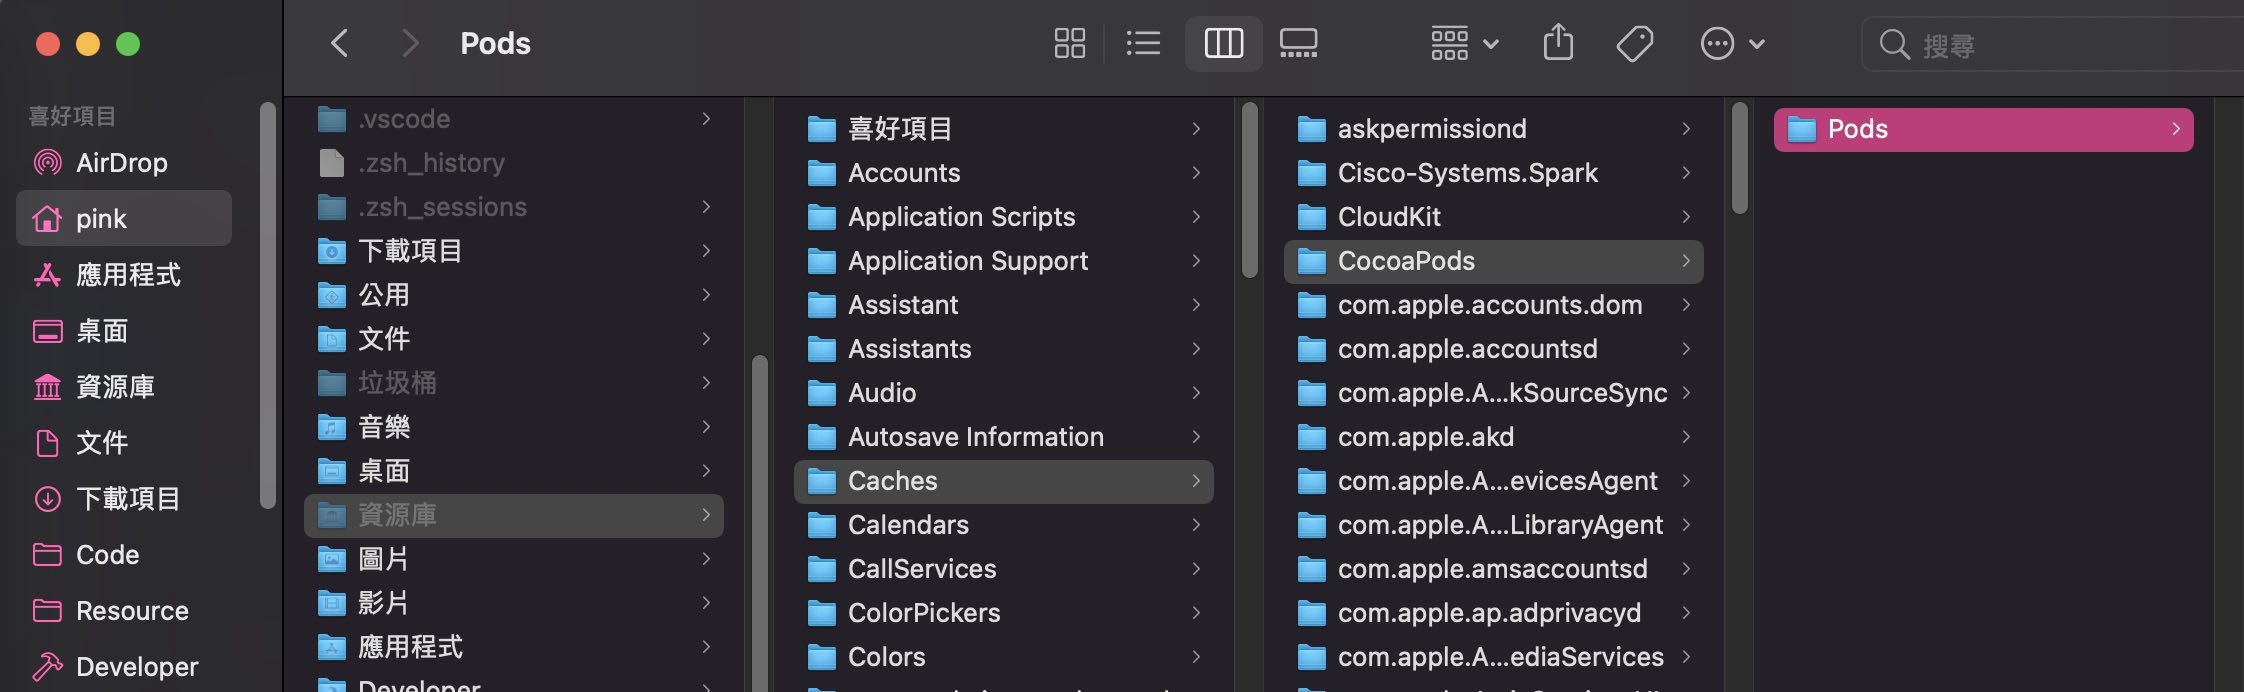
pod 'TestPodFramework'本機使用者的隱藏資料夾,有”兩個很重要的資料夾”
- 三方清單 的快取資料夾
- 也就是清單的 Local 快取(有問題可以刪掉再載)

- 也就是清單的 Local 快取(有問題可以刪掉再載)
- 三方程式碼 的快取資料夾
- 也就是程式碼的 Local 快取(也因為他們所以下載過的三方再次下載會特別快)
- 也就是程式碼的 Local 快取(也因為他們所以下載過的三方再次下載會特別快)
- 三方清單 的快取資料夾
開發流程
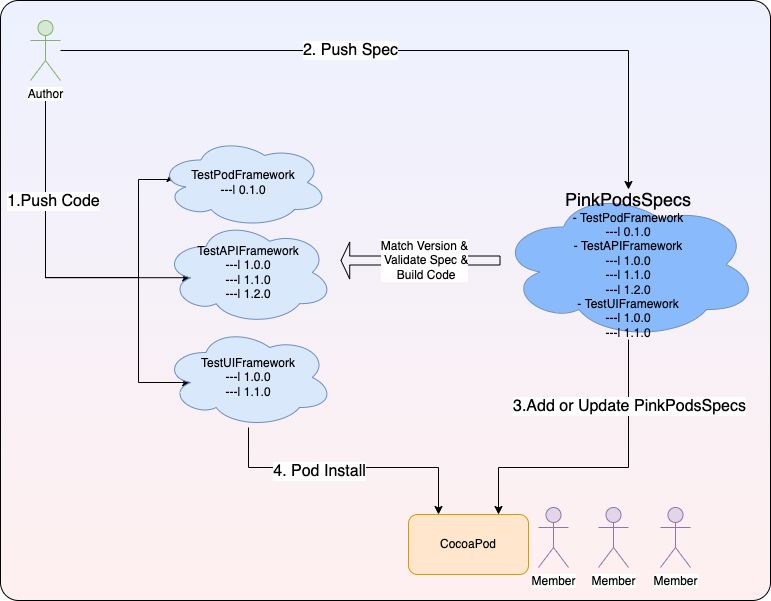
Author要做的事:
- Push Code:上傳模組程式碼
- 1 確認模組 repo 最新的 Master 就是你要發佈的程式碼版本
- 2 確認模組 repo 最新的 Master 的 podspec 檔的版本號是你要的新版號
s.version = "1.3.0" - 3 以上兩點都 OK,就加上新版號 tag 在 Master 上 (ex:1.3.0)
- Push Spec:發布模組
- 檢查podspec是否正確
- –allow-warnings => 允許警告
- –verbose => 詳細輸出執行步驟
1
pod spec lint --allow-warnings --verbose
- 發版: 注意此指令會Match Version & Validate Spec & Build Code,有問題請修正
- 法一
1
pod repo push PinkPodsSpecs TestPodFramework.podspec --allow-warnings --verbose
- 法二(設定sources)(上面有時會因為模組用到外部三方導致 push 失敗)
1
pod repo push PinkPodsSpecs TestPodFramework.podspec --allow-warnings --verbose --sources='https://github.com/CocoaPods/Specs.git,git@github.com:pinkpika/PinkPodsSpecs.git'
- 檢查podspec是否正確
- Push Code:上傳模組程式碼
Member要做的事:
- Add or Update PinkPodsSpecs:更新模組清單
- 第一次使用,請直接下載 PinkPodsSpecs
1
pod repo add PinkPodsSpecs git@github.com:pinkpika/PinkPodsSpecs.git
- 如果下載過,未來只要更新版本清單即可
1
pod repo update PinkPodsSpecs
- 顯示 Local 的 Pod repo 清單
1
pod repo
- 第一次使用,請直接下載 PinkPodsSpecs
- Pod Install:安裝模組
- 更改Podfile
1
2
3
source 'git@github.com:pinkpika/PinkPodsSpecs.git'
source 'https://github.com/CocoaPods/Specs.git'
pod 'TestPodFramework' - 單純安裝依賴(依照Podfile.lock)
1
pod install
- 更新依賴(建立新的Podfile.lock)
1
2
pod update
pod update TestPodFramework
- 更改Podfile
- Add or Update PinkPodsSpecs:更新模組清單
🤔【 問題 】
如何額外打包模組,不讓使用者知道內部的實作方式
[第四期]:Podspec + CocoaPods Private Specs + Carthage
利用 Carthage 封裝打包各個模組,安全的提供給外包或是合作廠商 (未來會補文章)
[第五期]:SPM
Apple 官方提供的套件管理系統 SPM(Swift Package Manager) (未來會補文章)
希望這篇文章有幫助到您的開發之路!如果能給我一些按讚支持,我會非常感謝您的鼓勵!祝壞蟲遠離您!